The Redwood Empire Bonsai Society (REBS) is back to having monthly in person meetings/demonstrations and workshops after an absence of two years due to COVID – 19 pandemic restrictions.
On Tuesday evening, March 17, 2022, Bob Shimon conducted the first demonstration for the club’s monthly meeting. Bob is past president of REBS. He owns and operates Mendocino Coast Bonsai, located at Point Arena, California, a full service bonsai vendor specializing in yamadori (collected from the wild) natives – coast redwood, Sierra juniper, live oak and Mendocino pygmy cypress.
Bob’s demonstration started by displaying a number of examples in Mendocino pygmy cypress bonsai at various stages of development.


Mendocino pygmy cypress (Cupressus pigmaea) trees are found slightly inland along the Mendocino coast in dwarf patches or forests (aka Pygmy Woodland). They are found in nutrient poor soils or hard pan in western Mendocino and northwest Sonoma counties. The poor soils or unbroken hard pan contributes to the dwarf sizes, bark characteristics and distorted growth patterns.
Bob described his experiences in collecting Mendocino pygmy cypress trees from the wild (yamadori). At first, he followed advice to remove all the original hard pan soil, which resulted in utter failure. He subsequently discovered retaining much of the original soil and root ball led to successful growth and eventual bonsai potting. He collects the trees when wet, but not soggy, which kept the root ball intact. This would take place in the month of January. Repotting would take place in February. Bob said that back budding does not occur on old growth branches. He described the foliage as greyish in color in the wild, but later turns wonderfully green when given water and fertilizer. He cited new growth must be managed through pruning or else the branches become leggy and the interior dies off. He indicated that the trees are unforgiving if allowed to dry out. Therefore, he recommends 50 to 100 percent Akadama in order to retain moisture.
Bob said that in collecting the Mendocino pygmy cypress in the wild he discovered other species growing, like the Shore Pine (Pinus contorta ‘Contorta’) and wild Red Huckleberry (Vaccinium parvifolium), suitable for bonsai.
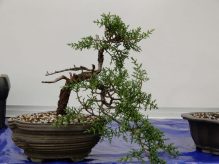
The demonstration Mendocino pygmy cypress is common for a collected tree. When collected, it showed greyish in color foliage and the foliage was sparse. Bob pointed out the growing pot contents as being original hard pan soil with added bonsai mix of Akadama and pumice. He reiterated after two years the collected tree will have healthy new roots, green foliage and begin to take shape as a bonsai.
Bob demonstrated wiring the branches. He said at this stage he was apt to leave more branches than needed. He was concerned about proper taper of the branches, that is large to small as appearing from the base to the apex. He then began to create pads with existing branches. He pruned the terminal tips on strong shoots; cutting back to secondary branches. This pruning took on classic pad formations and the overall desired silhouette or shape of the bonsai tree.
Bob discussed providing morning sun and afternoon shade for the potted tree. He said the terminal tips can burn and turn brown in the hot sun and strong winds. Bob suggested watering the foliage to help avoid drying out the terminal tips. For pot selection, Bob liked the primitive nanban style bonsai pot. He said repotting should be every year for the first three years as a bonsai. Each repotting session, one should remove a portion of the original hard pan soil to be replaced with bonsai soil mix.
Bob currently uses chicken fertilizer pellets with low NPK numbers for feeding his bonsai. He will supplement with Miracle Gro Plant Food.
Upon conclusion, the Mendocino pygmy cypress demonstration tree was raffled off. Alan Murakami won the demonstration tree with the winning raffle ticket.


Special Note: “In 1960, the Pygmy Woodland was estimated as covering 4,000 acres. There are perhaps 2,000 acres remaining today. It has been considered by municipal entities as land of no value, there being few merchantable trees, and the often saturated soils cannot support septic systems. Much of it has destroyed for use as landfills or garbage dumps or transfer stations or bulldozed for access roads or residences with highly engineered septic systems.
The Pygmy often presents as a stunted and misshapen, sometimes boggy, often impenetrable, lichen-clad, seemingly dead or dying, otherworldly landscape. This is due to the soils being extremely acidic, deficient in nutrients, with a degree of aluminum toxicity. They are often underlain with a cement-like hard pan 18 inches down, making drainage very poor. Soils are often saturated for much of the year.
More recently, it has been considered by environmentalists on a par with old-growth redwoods. The area that lies within the Coastal Zone is protected, but much of it lies outside.”1
1 Mendocino’s Pygmy Forest Remains Protected, October 27, 2019, By Mary Walsh, Chair, Mendocino Group, Sierra Club Redwood Chapter.


