Bonsai club founded in 1981, in Santa Rosa, CA. Dedicated to learning and promoting the living art of bonsai. Visit our website to discover more about the club.
11th Anniversary! Sonoma County Matsuri – Japanese Arts & Culture Festival
LOCATION Juilliard Park 227 Santa Rosa Avenue Santa Rosa CA 95401
DATE & TIME
Sunday, May 17, 2020 11:00 a.m. to 5:00 p.m.
REBS will participate again this year in the 11th
Anniversary of the Sonoma County Matsuri, a Japanese Arts & Culture
Festival, by displaying selected bonsai and accent plants.
Alan Murakami amurakami6@yahoo.com
will chair the bonsai and accent plant display.
REBS members who wish to display their bonsai should
contact Alan now. Space is limited. REBS members can also volunteer to docent
and hand out club information.
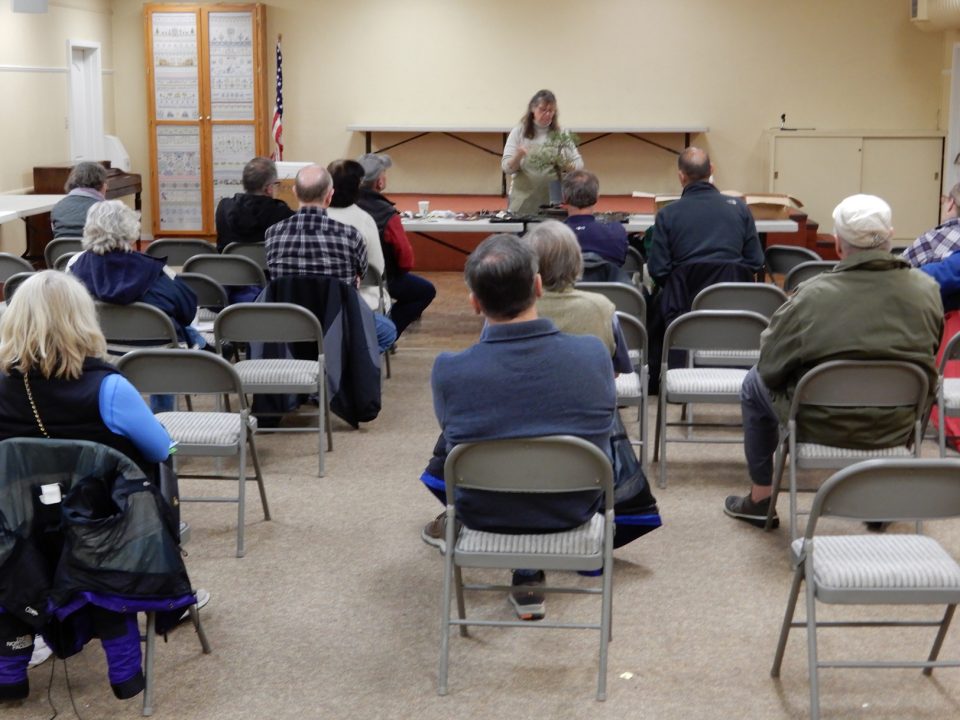
On January 28, 2020, club sensei Kathy Shaner performed a demonstration for members of the Redwood Empire Bonsai Society (REBS) working on a Maidenhair tree ‘Weeping Wonder’ (Ginkgo biloba ‘Weeping Wonder’)
Nice new weeping dwarf Maidenhair tree. It does have an upright leader with side branches going horizontal or slightly weeping. Leaves vary from lime green to dark green depending on environment. Characteristics: Sun Exposure – Sun; Annual Growth – 6 – 9 inches; @ 10 years – 5 feet x 2 feet; Color – green; Growth Rate – intermediate; Hardiness Zone – Zones 4-8. When the leaves drop, they drop rapidly, forming a golden carpet around the tree. Ginkgo have no serious insect or disease problems, making it a low maintenance plant. Low maintenance; soil moisture – moist to average, well drained; growth rate – slow; deciduous – fall color.1
Kathy started working with the demonstration tree by
uncovering the nebari. The tree was in a nursery container and so she used a
chopstick to dig around the base of the trunk, removing top soil to expose the
root structure. The nebari is the flair or surface roots radiating from the
trunk. Kathy pointed out that you can not really determine the front of your
bonsai without uncovering the surface roots. The front of the bonsai is
determined by the appearance of the surface roots or nebari and interesting movement
of the trunk.
Some of the many branches on the demonstration tree were
cut and removed. When cutting roots and branches it is critical to have sharp
tools. The cuts must be clean. Branch cuts must be smooth to heal quickly. This
is accomplished by using a sharp knife.
The Ginkgo biloba species has a tiny hole in the
center of the branches. When cutting the branch this hole is exposed and can
rot out from watering and rain. Cut paste is not effective to prevent water
from rotting out the cut branches. So, it is important to cut the branch on an
angle and to round off any tops or leaders. See images for examples.
Kathy noted that the cuttings from the Ginkgo biloba
are easy to propagate.
A number of primary branches on the demonstration tree
needed to pulled downward. A guy wire was used to perform this styling feature.
A rubber or plastic tubing was serrated so as not to pinch the branch. Copper
#16 was inserted into the tubing on one end and wrapped around the branch to be
pulled down. The other end of the wire was attached to the side of the nursery
container by making a hole in the container. The guy wire technique was
considered to be better than wiring the branch.
Another styling technique used on the demonstration tree
was to insert tiny pieces of bamboo between two branches, thereby separating
the branches so they did not grow too close to each other.
Wiring – Kathy used very little wiring of the Ginkgo
biloba. She cautioned against having wiring cuts caused by wrapping wire
around the branches too tightly or leaving the wire on the branches too long. Wiring
should be loosely wrapped around the branches. Paper can be wrapped around the
wire to help protect the branches. The holding period on wired branches depends
a lot on the growth of the tree. A watchful eye must be taken to ensure the
wiring does not cut into the branches.
Kathy proceeded to remove and thin out branches. This will
allow sun light in to the interior of the tree. Remove branches located in the
crotches. Kathy suggested not to stay in one place while thinning out the
branches. Instead, move around and work in a manner to balance the work areas.
Upon completion of the demonstration, the Ginkgo biloba
‘Weeping Wonder’ was raffled off. The winner was Joanne Lumsden.
1 Internet searches on Ginkgo
biloba ‘Weeping Wonder’.
The REBS 2020 calendar of events has been updated and posted to the Events menu of the web site. Mark your calendars for meetings/demonstrations, workshops and special events.
On November 26, 2019, our club Sensei Kathy Shaner
performed a demonstration on the styling of a juniper. The juniper demo tree
was furnished by Bob Shimon of Mendocino Coast Bonsai, who purchased the tree
from Takashi Shimazu at the GSBF Convention 42, Riverside, California, October
24-27, 2019.
The demo showed movement in the trunk and deadwood feature.
Kathy said one should ensure the tree material is well
hydrated before working on it. She like the front view which was chosen for its
movement and Shari deadwood feature. The front view is always towards the
viewer. She described her plans to cut the foliage in order to encourage back
budding on branches. The back budding will occur closer in to the trunk and
cause the foliage to appear more compact.
Flow or direction of the branches was considered in the
styling of the demo tree. Kathy experimented with the angle of the tree to
expose a more interesting line and movement.
Wiring the branches is critical in styling any bonsai.
Kathy emphasized the correct size or gauge of wire to do the job of controlling
the movement instilled in setting branches. If one has doubt, use one gauge
lower with copper wire. Kathy said wrap the copper wire loosely around the
branches. This will allow for bending and twisting the branches. It will also
allow the copper wire to remain on the branches longer and avoid wire cutting
into the bark.
In bending branches, Kathy demonstrated exercising the
branch first. Just using your fingers and move the branch to be bent up and
down or twist side to side. This will make the branch more flexible prior to
wiring and bending it. Then wire the branch and set it by bending and twisting
the branch in to the position desired. On conifers like the juniper, bend the
branches downward. This action will allow more sun light to reach the interior
of the tree. One last note on bending branches is to bend or establish movement
near the trunk.
Kathy explained the setting of the first, second and back
branches. She created a flow or direction of the branches to appear as if the
wind influenced them.
Upon completion of the demonstration, REBS member Diane
Matzen won the raffle for the demo juniper.
This
month’s demonstration was performed by Matthew Walker. Matthew worked on a
collected Sierra juniper. The yamadori material had been collected three years
prior. Matthew shared that these Sierra junipers are found at elevations
between 6800’ and 8200’. The tree was presently in a plastic bonsai training
pot planted in three equal parts Akadama, pumice and lava rock. Showing its
signature blue, green, gray foliage, it was ready for its first styling. The
original starting size of the tree was one hand lifting Katade-mochi size
approximately 14” wide and 10” tall. The interesting and powerful material was
at one point attached to a larger tree. As the styling progressed, the completed
tree ended up more compact; ending up in the Komano small size approximately 9”
in diameter and 10” tall. As with the first styling of most trees the challenge
of finding the front and angle of the tree presented a few options. With ample
dead wood and live life lines from the 3” trunk and slightly wider nebari to
the curved 4” Y above, the front highlighting theses desirable attributes was
determined.
The
next decision to be made was the form of a somewhat larger 8” long primary
branch curving away from the main trunk and extending parallel about 6” above
the soil line. This branch would prove to be a challenge since its connection
to the Y and main trunk was showing signs of splitting and being too thick to
bend. The verdict was to reduce its length and to jin the branch to
approximately 4”. Matthew pointed out that the base of jin should have angles
and taper which gives it a more natural look as opposed to a symmetrical ring
where it meets the remaining bark. He also mentioned that a torch is a good way
to remove smaller splinters and hair like fragments. A wet towel is essential
to cover and protect the other parts of the tree while doing so.
As
wiring commenced, starting on the lower secondary branches, the yamadori
material began to reveal its bonsai identity. Matthew gave many valuable tips
on wire bending specifically with how the wire should be wrapped into a slight
hook at the end of each limb in order to keep it in place and at the desired
direction. Foliage pads were craftfully created with the tips longer than side
branches creating five to six tapered fans extending from the gracefully curved
trunk.
Matthew
reminded us that the apex of bonsai trees can be the most difficult and time-consuming
aspect to styling. Referring this part of the creation as the “comb over”, an
apex may be made of two or more small branches and compacted for density.
The
elegant yet rugged bonsai tree was completed by being placed in its new
appropriate angle with its training pot placed in a three-gallon plastic
nursery pot at about 45 degrees.