On September 25, 2018, between 7:30 and 9:30 p.m., at the Luther Burbank Art and Garden Center, Santa Rosa, California, Jonas Dupuich conducted a demonstration on Satsuki Azalea bonsai imported from Japan. Jonas is a professional bonsai grower, artist, instructor, and vendor. He has been growing azaleas for about 20 years.

Satsuki Azalea (Rhododendron indicum) is native to Japan. Satsuki is a Japanese term that refers to the bloom period, May or early June. There are thousands of different varieties. Satsuki azaleas are popular bonsai plants for many reasons. It can take a hard pruning, the flowers are amazing, and they can be developed fast. Since azaleas prefer to be slightly acidic, a popular soil to grow them in is Kanuma. 
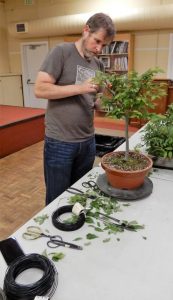
Jonas brought with him a number of Satsuki Azalea bonsai for showing different varieties, leaf sizes and shapes, and styles. He mentioned that Satsuki Azalea can be styled in numerous ways. He chose as his demonstration bonsai a cascading Satsuki Azalea with multiple trunks, at least four primary trunks. In choosing the front view, Jonas preferred in bonsai to show the trunks. However, since it was Satsuki Azalea it would be better to show off the most flowers.


He started to cut and thin out the leaves and tiny branches on the demonstration bonsai. He said general guidelines for cutting and thinning applied here. Cutting the tips, lower leaves leaving two leaves per branch or stem, removing vertical and downward growing branches and stems. Jonas said when cutting branches he will leave a small stub or convex cut. After cutting branches, he would seal the wound with a cut paste and wound seal. (Top Jin Cut Paste and Wound Seal, yellow in color, stops bleeding and helps to protect from fungal infection). Sometimes branches are found to be in clusters of three or more. These should be cut back to two branches.
Jonas said he uses 100% Kanuma for soil. Repotting should take place when watering appears to slow in draining, a sign that the Kanuma has been compacted and roots have filled the pot. Jonas mentioned the function of watering bonsai plants. Watering pushes out any old residues and pulls in oxygen vital to the health of the plant.
Some things to avoid with Satsuki Azalea bonsai are wind, salt and cold. An environment close to the coast would be challenging for growing Satsuki Azaleas.
Popular times to wire Satsuki Azaleas is after the bloom and in the summer. Besides wiring, the clip and grow method can be useful.
Jonas led an interesting discussion on how commercial growers produce Satsuki Azalea bonsai in Japan. There are various levels of growers for each phase of developing the Satsuki Azalea bonsai. One level may grow whips, another for wiring and creating movement in the whips, other levels to transfer to and from the ground for growing large trunks.
Jonas uses 30% shade cloth when the temperatures are 75 degrees in Alameda and recommended 40% shade cloth when temperatures reach 85 degrees elsewhere.
In discussing wiring Satsuki Azalea bonsai, Jonas said he looks for beauty and function. The discussion led to the degrees in the angle of wiring. Where 45 degrees was the standard for wrapping wire around branches, the trend today is somewhere between 55 and 60 degrees. Again, the most important factors are beauty and function of the wiring.
Fungus is a problem. It can be root or leaf fungus. Root fungus can first show up by having black leaf tips.
Large branch bending – it is not really possible to bend large branches with wire wrapping. Instead, use guy wires to lower or raise large branches.
Finally, removing the flowers after bloom will send energy to the leaves.
Jonas worked on the demonstration tree during the discussions above. He removed unwanted weak branches, cut and thinned out the leaves, wrapped wire on small branches to lower and show movement, and used guy wires to lower the larger branches. The result was a well shaped cascading Satsuki Azalea bonsai.


A raffle was conducted for the demonstration bonsai and Jim Gallagher was holding the winning ticket.

 Kathy started the demonstration by pointing out what we should be looking for in a bonsai. That being the best focal point or item of interest within the tree. She believed that the redwood demonstration tree could be developed into a multiple trunk bonsai. She began by working the surface soil, removing the soil to expose surface roots and discover what was the extension of the trunk base, referred to as the nebari. The widest part of the trunk base or nebari is oftentimes used for the front view. The nebari is found under the surface.


 The demo tree was a healthy green and full of foliage. There were several primary branches. Kathy first dug into the surface soil to discover the nebari girth (strength of the surface roots and trunk base). She removed some of the length in the foliage to give a better look at the movement of the trunk.
 By removing the dense foliage, one could see the strength and interesting movement of the trunk.
 After a bit more styling, it is time to raffle the tree. Kathy and Raffle Chair Wayne Culp build on the excitement in selecting the winning raffle ticket.
 Club member Jim Scholz was rewarded for buying the raffle tickets by adding the Procumbens juniper to his bonsai collection.


 Eric holding up his Zelkova bonsai
 Eric’s Zelkova bonsai example