Demonstration by Sensei Kathy Shaner – Juniper

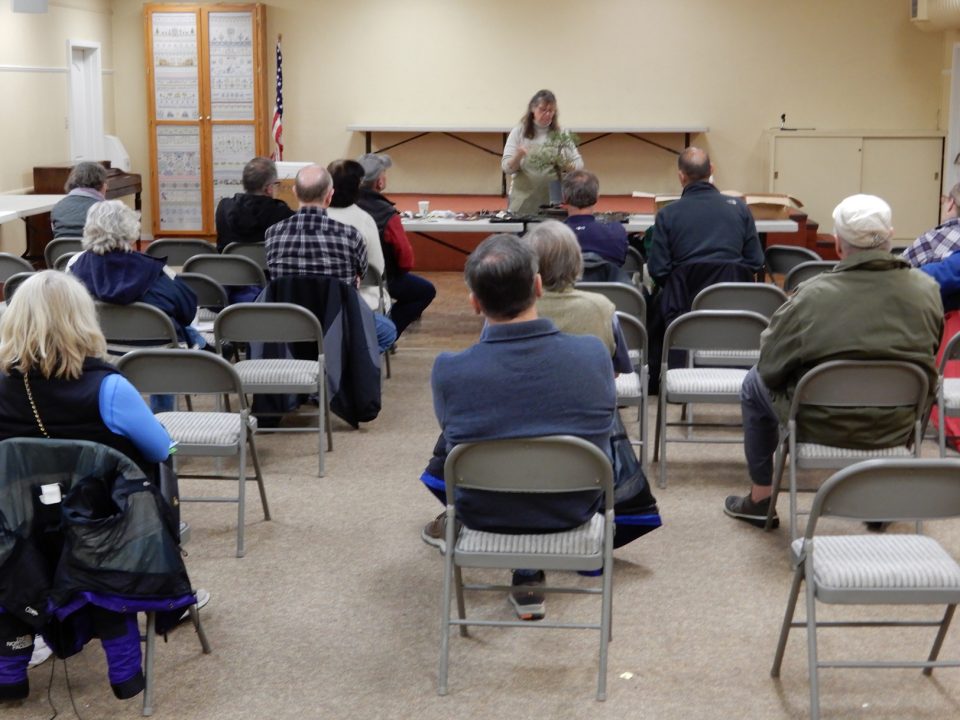
On November 26, 2019, our club Sensei Kathy Shaner performed a demonstration on the styling of a juniper. The juniper demo tree was furnished by Bob Shimon of Mendocino Coast Bonsai, who purchased the tree from Takashi Shimazu at the GSBF Convention 42, Riverside, California, October 24-27, 2019.

The demo showed movement in the trunk and deadwood feature.

Kathy said one should ensure the tree material is well hydrated before working on it. She like the front view which was chosen for its movement and Shari deadwood feature. The front view is always towards the viewer. She described her plans to cut the foliage in order to encourage back budding on branches. The back budding will occur closer in to the trunk and cause the foliage to appear more compact.

Flow or direction of the branches was considered in the styling of the demo tree. Kathy experimented with the angle of the tree to expose a more interesting line and movement.

Wiring the branches is critical in styling any bonsai. Kathy emphasized the correct size or gauge of wire to do the job of controlling the movement instilled in setting branches. If one has doubt, use one gauge lower with copper wire. Kathy said wrap the copper wire loosely around the branches. This will allow for bending and twisting the branches. It will also allow the copper wire to remain on the branches longer and avoid wire cutting into the bark.

In bending branches, Kathy demonstrated exercising the branch first. Just using your fingers and move the branch to be bent up and down or twist side to side. This will make the branch more flexible prior to wiring and bending it. Then wire the branch and set it by bending and twisting the branch in to the position desired. On conifers like the juniper, bend the branches downward. This action will allow more sun light to reach the interior of the tree. One last note on bending branches is to bend or establish movement near the trunk.

Kathy explained the setting of the first, second and back branches. She created a flow or direction of the branches to appear as if the wind influenced them.

Upon completion of the demonstration, REBS member Diane Matzen won the raffle for the demo juniper.

Demonstration by Matthew Walker – Collected Sierra Juniper

This month’s demonstration was performed by Matthew Walker. Matthew worked on a collected Sierra juniper. The yamadori material had been collected three years prior. Matthew shared that these Sierra junipers are found at elevations between 6800’ and 8200’. The tree was presently in a plastic bonsai training pot planted in three equal parts Akadama, pumice and lava rock. Showing its signature blue, green, gray foliage, it was ready for its first styling. The original starting size of the tree was one hand lifting Katade-mochi size approximately 14” wide and 10” tall. The interesting and powerful material was at one point attached to a larger tree. As the styling progressed, the completed tree ended up more compact; ending up in the Komano small size approximately 9” in diameter and 10” tall. As with the first styling of most trees the challenge of finding the front and angle of the tree presented a few options. With ample dead wood and live life lines from the 3” trunk and slightly wider nebari to the curved 4” Y above, the front highlighting theses desirable attributes was determined.

The next decision to be made was the form of a somewhat larger 8” long primary branch curving away from the main trunk and extending parallel about 6” above the soil line. This branch would prove to be a challenge since its connection to the Y and main trunk was showing signs of splitting and being too thick to bend. The verdict was to reduce its length and to jin the branch to approximately 4”. Matthew pointed out that the base of jin should have angles and taper which gives it a more natural look as opposed to a symmetrical ring where it meets the remaining bark. He also mentioned that a torch is a good way to remove smaller splinters and hair like fragments. A wet towel is essential to cover and protect the other parts of the tree while doing so.

As wiring commenced, starting on the lower secondary branches, the yamadori material began to reveal its bonsai identity. Matthew gave many valuable tips on wire bending specifically with how the wire should be wrapped into a slight hook at the end of each limb in order to keep it in place and at the desired direction. Foliage pads were craftfully created with the tips longer than side branches creating five to six tapered fans extending from the gracefully curved trunk.

Matthew reminded us that the apex of bonsai trees can be the most difficult and time-consuming aspect to styling. Referring this part of the creation as the “comb over”, an apex may be made of two or more small branches and compacted for density.

The elegant yet rugged bonsai tree was completed by being placed in its new appropriate angle with its training pot placed in a three-gallon plastic nursery pot at about 45 degrees.

–Steve Triolo

Photos by Diane Matzen

Demonstration by Jonas Dupuich – Carving Basics

On September 24, 2019, Jonas Dupuich, author of Bonsai Tonight, performed a demonstration on carving basics for the members of the Redwood Empire Bonsai Society (REBS), in Santa Rosa, California.

Jin is a bonsai deadwood technique used on branches or the top of the trunk (the “leader”). A jin is meant to show age, or show that the tree has had a struggle to survive. Jins are created in nature when wind, lightning, or other adversity kills the leader or a branch further down the tree.1

A shari is deadwood on the main trunk of the bonsai. A small shari usually runs vertically on or near the front of the trunk – shari have little aesthetic value at the rear of the trunk, where they are rarely viewed and are obscured by branch growth.2

Carving basics for bonsai involves the creation of deadwood features, jin and shari. By incorporating these deadwood features into the design of your bonsai you are creating character, age and interest.

Jonas began his demonstration by showing a slideshow of various images taken of natural deadwood on Bristlecone pines located above 10,000 feet elevation in the California White Mountains and Sierra junipers located above 8,000 feet elevation at California Carson Pass. These trees displayed dramatic deadwood features, the result of many years of adverse weather and environmental conditions. The slideshow also provided images of Japanese bonsai on display at Kokufu Ten Bonsai Exhibition and Taikan Bonsai Exhibition organized by the Nippon Bonsai Association, both being leading bonsai exhibitions in Japan. The bonsai exhibition images depicted natural and carved deadwood features.

Jonas explained there were three elements of good deadwood carving: movement, twists and interest. He talked about natural occurrences in creating deadwood, that is wind direction. The design must take into play the direction or flow caused by the wind or design. Carving deadwood features should have a story or reason. For example, jin at the top of the tree might have been caused by lightning and shari in front of the flow of the tree’s movement caused by wind.

Carving tools may include: root cutters, pliers, jin pliers, knife or box cutters, and wood carving tool chisels.

Jonas said one should start out by cleaning the life line of the tree in order to find where the deadwood is located on the tree. Dead branches or stubs of former branches in a row on the trunk of the tree is a good indication of where to find deadwood on the trunk. Begin by scrapping away the bark attached to the deadwood. Use a tool like a jin loop or jin knife to determine where the deadwood and live wood are located.

Jonas advised to use wood carver’s gloves for safety.

Jin the lower branches on junipers and other species. These are branches located 1/3 to 1/2 up the trunk that when wired downward would be touching the soil.

A jin is started by taking a sharp knife or box cutter and cutting into the bark at the base of the branch and trunk. Cut completely around the branch. This will stop the bark from being pulled into the trunk area when stripping the bark off the branch. Use a pliers or jin pliers to squeeze and crush the bark away from the branch. Then remove the bark. It is best to create jins in the spring when the water flow is present and the bark is easily removed by your fingers. Otherwise, a jin knife or loop must be used to remove the dry bark. Once the bark has been completely removed, then shape the jin to a pointed end in order to eliminate the tool cutting mark. If bark fibers remain on the jin section, these can be removed best with a wire brush or by burning them. Care must be taken not to burn foliage or live wood. After burning the fibers, a wire brush is used to remove the burn marks.

A shari is started by using a Sharpie ink pen to outline the area of bark to be removed from the trunk. A sharp knife or box cutter is then used to cut into the bark. Score the bark along the outlined area. Then, the bark can be removed by pealing back the bark and working with the wood grain. Use a scissors to cut any portion of the bark that does not peal off easily.

1 https://en.wikipedia.org/wiki/Deadwood_bonsai_techniques

2 https://en.mimi.hu/bonsai/shari.html

REBS Demonstration by Bob Shimon – San Jose Juniper

On August 27, 2019, Bob Shimon performed a demonstration for the members of the Redwood Empire Bonsai Society (REBS) on a San Jose juniper (Juniperus chinensis ‘San Jose’. Bob recently purchased the San Jose juniper from the member sales area at the August 24 and 25 REBS annual bonsai show. He said the San Jose juniper had character and interest as bonsai material for his demonstration. Some of the factors lending to character included: deadwood at the base of the trunk; a large base at the trunk; movement in the trunk; no or minimal taper in the trunk suitable for a bunjin or literati style bonsai; foliage concentrated at the top.

One of the first things to do when purchasing or beginning to work with bonsai material is to scratch away the surface soil from the base of the trunk to expose the root structure. A few inches is sufficient to observe the flaring of the trunk base. Bob saw a bunjin style bonsai within the material. He would proceed to cut and remove small interior branches. He would also remove unwanted branches and any dead branches. He said the main purpose of the demonstration material was to establish branch structure. There were two main trunks; one had to be removed as it was competing with the other and in conflict with the intended design. Bob used a sharp hand saw and removed the smaller of the two branches. What remained was a fairly long, curving branch with its foliage near the top.

Bod identified a number of smaller secondary branches that he would jin. Jin is Japanese for deadwood feature for a branch. Shari is also Japanese for a deadwood feature along the trunk of the tree. Both deadwood features are seen in nature and add to the character and age of the bonsai. Where branches were removed, Bob created jins. The jin is made from a short stub of the cut branch. A long jin is not true to nature. The best time of the season to work on creating jins and shari is when the tree sap is present.

Bob discussed a little about the horticulture for bonsai. Most bonsai require the outdoors. Exceptions are tropical and sub-tropical plants. Bonsai soil for junipers or conifers is on the dry side; usually one third pumice, one third lava rock and one third Akadama (a fired clay imported from Japan). Redwoods and deciduous require more moisture and use more Akadama. Fertilizers are required for bonsai since the soil mix for bonsai is inorganic. A common fertilizer schedule is any 10-10-10 fertilizer during the growing season and 0-5-5 during the winter months.

Bob said wiring is critical for bonsai. Learning how to wire properly is something that everyone must accomplish in order to work on bonsai. Copper wire is normally used with conifers, whereas aluminum wire is used on deciduous trees. Ivan Lukrich, the senior instructor at REBS, assisted in wiring of the demonstration tree. Ivan, who also teaches the beginners workshops, said REBS uses aluminum wire in the beginners’ workshops since it is easier to work with, can be removed and reused if needed.

Ivan proceeded to wire the San Jose juniper. The copper wire will require removal once it begins to indent the branches. The branches will grow larger but the copper wire will not, thus cause wire to cut into the bark making ugly wire cuts. He said observe the wire from time to time and ensure it does not cut into the bark.

Bob estimated the San Jose juniper to be about 20 years old. He recommended repotting with a bonsai soil mix next winter. He would use the same nursery pot but cut the pot in half to accommodate shortening the roots.

When the demonstration was finished, the San Jose juniper was raffled off to the members in attendance. Becky and David Jackson won the demonstration tree.

Bob Shimon, Becky and David Jackson with demo bonsai tree

36th Annual Show

The 36th Annual Show by the Redwood Empire Bonsai Society (REBS) was held on August 24 and 25, 2019 at the Santa Rosa Veterans Memorial Building, Santa Rosa, California. The REBS annual show is the largest club show in the US. Some 200 bonsai were on display. The San Francisco Suiseki Kai joined again this year to show their suiseki viewing stones. Visitors were treated to two rows of tables with viewing stones from northern California and Japan.

Club sensei Kathy Shaner oversaw the placement of bonsai, companion plants and art objects. She conducted a demonstration, both days, working on a Sierra juniper and Coast redwood, respectively.

A special thank you to the club members who contributed to the annual event by displaying their bonsai and helping to set up, docent and clean up.

Here are some of the outstanding bonsai featured in the annual show.