Preparation for De-candling of Your Japanese Black Pine By Michael Murtaugh

These are some notes for you to think about before you get to the de-candling of your Japanese Black Pines. I have found if I de-candle between June 1 and June 10, I get good sized needles that match my size trees. These are Chyhin size trees, say 8” to 18” tall.

These first photos show typical candles on my pines. The left one is actually a stunted candle which came out normal in the spring, but because of a lack of water actually shut down and stopped growing. I am trying to revive it. The right hand one is more normal growth for a vigorous candle.

De-candling is a refinement technique on multiple flush pines only. JBP and Japanese Red Pines are the only pines we can do this on because they are so vigorous. Shore pines, Limber pines, Ponderosa and most other pines are single flush pines and are not vigorous enough to withstand this kind of treatment and respond in the same way.

Taking off the candles, in a sense, re-sets the tree back to the beginning of the growing season. If you cut candles earlier than June 1 the new set of candles have longer to grow through the summer and will be bigger and longer. If you wait and cut the candles off in July or later the new candles will have less time to grow in the summer and will be shorter when they mature.

De-candling is only used when you are trying to grow shorter needles and produce tighter and denser foliage. If you want bigger trunks or longer branches – don’t cut the candles!

These are candles on a pine in development. I will not be cutting these.

This exposed root pine was weak last year and was transplanted this spring. There are no new growth that has come out this year, but the yellow color is now a barker green. I will not do anything except water and fertilize this the rest of the growing season.

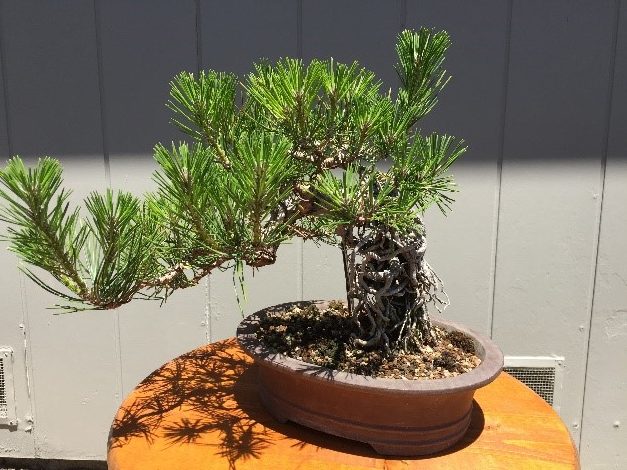
This exposed root pine has grown well and normal this spring. It has been fertilized well up until a few weeks ago when I stopped all fertilizer. No more fertilizer until mid-Fall. I will cut the candles on this the first week of June. The needles have opened up and begun to harden off. There is no further growth or extension of the candle going to happen. If left alone the needles will continue to lengthen but the candle will not lengthen much if at all.

I will cut all candles on the same day and each will be cut to about 2 mm into this year’s growth.

This is the typical technique of cutting candles. Within a few weeks there will be small rice-like buds happening at each cut site. If there is enough vigor there may even be needle buds activated further back on each stem or smaller buds further back in will begin to grow.

This is one of two times during the year you can add some wire as needed and reposition your shoots. Just be careful not to damage any interior buds.

This tree has long candles at the top of the tree and very little growth on the lower branches. In this case it is alright to de-candle the top and not cut the lower branches. This will begin to balance the growth throughout the tree and it will be more uniform top to bottom next year. Cutting the top this year will encourage growth on the bottom for the tree this year.

Cutting back vigorous growth on Black Pines at this time of year is a way to use that vigorous growth to start a second round of growth that will be smaller and denser. When that density and compactness grows out for the rest of the year without any further pinching or cut back it will be necessary to thin out that growth when the end of the growing season has passed. The next major work will be about October or November.

Pines look best when shown in mid-winter when all growth is fresh and healthy from the late season growth.

I hope this gets you to thinking about working on your pines in the next few weeks. If you have any questions I am available to talk. If you want to post photos of your trees I am sure we would all like to see what you are doing.

Stay safe and stay sane. Michael

Covid-19 Update

Due to the current stay at home restrictions, there are no scheduled meeting/demonstration and workshops for May 2020.

Now that May is here, it’s time to get back to work on our deciduous and broad leaf evergreen Bonsai. Most of our deciduous and broad leaf evergreens’ foliage has now hardened off which is one of the signs we look for before we wire, style and cut our Bonsai.

Do you remember the other three things we look for?

  1. General overall growth of our bonsai (Bonsai getting bushy)
  2. Runners of the terminal ends of branches
  3. Foliage has hardened off

If you plan to wire/style and cut your Bonsai, be sure that they are showing the above three signs.

Getting Busy with Deciduous

From now till November is the busy season for deciduous and broad leaf evergreens. These trees are not necessarily labor intensive but time sensitive. Deciduous or broad leaf evergreen Bonsai can grow fast, you may be working on them several times during the growing season. Fast growing Bonsai also thicken fast, so if wire is applied to the branch, keep an eye out or the branch will grow over the wire. Generally, I never keep wire on a deciduous tree for more than a year and have removed wire as soon as within three weeks of application.

When is the right time you ask? If a branch needs thickening, then let it grow, if the branch is thick enough, then cut them back to create division.

Generally, deciduous and broad leave evergreens can be cut/thin/styled this month. An exception can be cork bark oak. They start to leaf out later in the spring and tend to be worked on more at the end of May or even June.

Fast vs. Slow Growing Bonsai

It’s important to understand that working with Bonsai that grows fast, requires a lot more of our time, whereas Bonsai that grows slow requires less of our time. The benefits of a fast growing tree is that you can develop the tree quickly into Bonsai whereas slower growing trees take much longer to develop into Bonsai.  For example, a Chinese elm can be refined much faster than a beech. Knowing how much time you have to spend on your Bonsai may cause you to select specific species to work with.

Defoliation and Some Misconceptions:

First off, not every deciduous tree needs to be defoliated. There are also species out there that will not take kindly to defoliation at all (e.g. hornbeam, beech, certain varieties of Japanese maple), especially if the defoliation is complete. Defoliation isn’t only done on deciduous trees either. There are other broad leaf evergreens that can take defoliation (oaks, silverberry and ficus are a few examples).

So, what is Defoliation and what does it do for us?

  1. Weakens the defoliated area
  2. New Leaves will be smaller
  3. Easier to wire branches
  4. Maintain (NOT Create) Ramification (We’ll discuss this more at the workshop)

Those are the four main reasons why we choose to defoliate. If your current goals don’t match up with any of the four reasons, then don’t defoliate.

Example: We want a branch to grow out and get stronger. We don’t defoliate that branch because it will slow the growth down.

Misconceptions: Cutting back vs. Defoliation

The biggest misconception to defoliation is that it will give you back budding. Back budding is not caused by defoliation, but by the cutting back of branches. We can cut the tree back without defoliating and back budding will occur. Keep defoliation and cutting back into two separate categories to help ease the understanding of defoliation.

Wiring

If you plan on wiring your trees this month, be sure to bring the proper wire size ranges. Aluminum wire should be used for deciduous and broadleaf evergreens, whereas copper should be used for conifers. Ideally you should have a set of aluminum wire in the following sizes: 1mm, 1.5mm, 2.0mm, 2.5mm, 3mm, 3.5mm.

Watering

As always, be aware of how wet or dry your trees are and water accordingly. Recognize which trees like water (deciduous) and which trees don’t like water (high mountain pines). Training your eyes and understanding your tree’s water consumption rate will help you catch any problems that arises. You may notice that a tree that normally takes a lot of water isn’t taking as much anymore. Is there a problem developing or is it because the tree was recently cut back? If you see these things early, you can make adjustments that will help your tree continuing to growth healthy.

…more to be added in the future

The above information and more can be found on the web site established by Peter Tea at https://www.ptbonsai.com/. Peter is a professional bonsai artist and teacher.

Stay healthy and safe.

Demonstration by Jonas Dupuich – Exposed Root Japanese Black Pine

On February 25, 2020, at the Luther Burbank Art and Garden Center, Santa Rosa, California, Jonas Dupuich was the guest bonsai artist and instructor for the members of Redwood Empire Bonsai Society (REBS). Jonas demonstrated on creating and growing exposed root Japanese Black Pine bonsai. He has been growing Japanese Black Pine from seeds for the past 26 years. The exposed root bonsai technique is most popular with the Japanese dwarf flowering quince or Chojubai bonsai. It is used with Japanese Black Pine and Satsuki Azalea bonsai as well.

Jonas brought to the demonstration two of his own examples of mature exposed root Japanese Black Pine bonsai. Each 16 years in training, grown from seed. See photos.

In addition, he also brought Japanese Black Pine exposed root plants, one 10 years in training and the other one-year old, both from seed. These two plants were raffled upon completion of the demonstration. See photos.

Style – exposed root bonsai can be given the story as falling off the side of a cliff or even damaged from a flooding. It can be with long versus short roots depending on design. The roots may be thick and large or slim and small. There can be a certain balance of roots supporting the trunk.

Pots – suitable pots are usually round in shape and can be grey, red or brown.

Jonas began his demonstration with a slideshow depicting various exposed root Japanese Black Pine bonsai from a recent trip to the Kokufu Ten 2020 Exhibition and Green Room in Japan. The pictures showed different shapes and paths for the exposed roots. No one bonsai looked the same.

The first demonstration plant was the one-year old. Jonas used a one gallon nursery container and blocked the large holes in the bottom with construction sheet wall tape to prevent soil from leaking out. He then filled the bottom with a small bonsai soil mix (Clay King premix and pumice). Next, he inserted larger pieces of Japanese Hyuga (pumice). Jonas used a long nursery container popular with nurseries for Blueberry plants and placed it upside down (narrow bottom with a hole on the up side) in the one gallon container. By placing the second container upside down this would prevent the roots from growing wide to narrow or like a reverse taper. This second container was then filled with the Hyuga large pieces. Finally, the one year old Japanese Black Pine plant was inserted through the hole with all its roots attached. With the roots planted in the second container, it is then filled with more of the small bonsai soil mix. The latter will help keep the roots moist.

Jonas commented on watering by citing less water was needed. It should never be allowed to dry out completely.

Jonas said the planting should be checked three to five years later unless you want a smaller exposed root bonsai, like a Shohin. Once you established the size of the roots desired, then you must remove the small bonsai soil mix and large pieces of Hyuga. This is best done with a pick tool or chopsticks.

The exposed roots can be then manipulated in many ways to style your bonsai.

Jonas moved on to the 10-year old exposed root Japanese Black Pine demonstration tree. This plant was contained in a round terra cotta pot with the exposed roots partially planted inside plastic bonsai drainage screen material. The plant was allowed to grow without much attention. There were two large sacrifice branches for thickening the trunk still attached. A number of smaller branches were located near the base of the trunk.

Jonas first wanted to choose a front view and there were two options based on the shape and flow of the existing branches. The front view was marked with a chopstick. Of the smaller branches, two long branches near the base of the trunk were selected to wire. A single piece of Aluminum wire was used to wrap around the two branches. Starting at the back, Jonas wrapped the wire around the two long branches. He cut off several of the smallest branches as they were not needed. Once wiring was done, Jonas had REBS member Diane Matzen to establish movement in a downward direction and end facing the front view. Then, on the other wired branch REBS member Michael Murtaugh established movement in an upward direction, ending towards the front view. These wired branches gave the future owner choices in styling the bonsai, either downward for a cascade or upward for an informal upright style.

Jonas discussed the technique of bending branches and putting movement in the bonsai. He said bending should always start at the trunk and move in a downward or upward direction. There should be no flat wiring or straight areas. Always check your bending of branches afterwards and fix any straight areas. Black pine branches are very flexible but always support with your fingers the bends.

Upon completion of the demonstration, Diane Matzen won the 10-year old bonsai and REBS member Mike Nelson won the one-year old bonsai. Congratulations to both.

32nd Annual Sonoma County Home & Garden Show


Come and celebrate over a quarter century of satisfying your home improvement needs at the 32nd Annual Home & Garden Show, in the beautiful Sonoma County Fairgrounds. Our premier show continues to be the biggest and best complete one stop shopping event. Whether you are looking for a complete home remodel, a kitchen or bath makeover, a beautiful newly landscaped yard, or just like to shop for your home, you will find it all at the Home & Garden Show.

REBS members will participate in the 32nd Annual Sonoma County Home & Garden Show with the display of bonsai and accent plants. To participate, call Art Kopecky at 707-849-6974 or sign up at the REBS monthly meeting on February 25, 2020. Set up will be on Friday, March 20, 2020, at 9:00 a.m. You can also participate by signing up to be a docent.

LOCATION:

Sonoma County Fairgrounds
1350 Bennett Valley Rd.
Santa Rosa, CA 95404
(click for directions)

DATES & TIMES:

Friday, March 20th
12:00 pm – 7:00 pm

Saturday, March 21st
10:00 am – 7:00 pm

Sunday, March 22nd
10:00 am – 5:00 pm